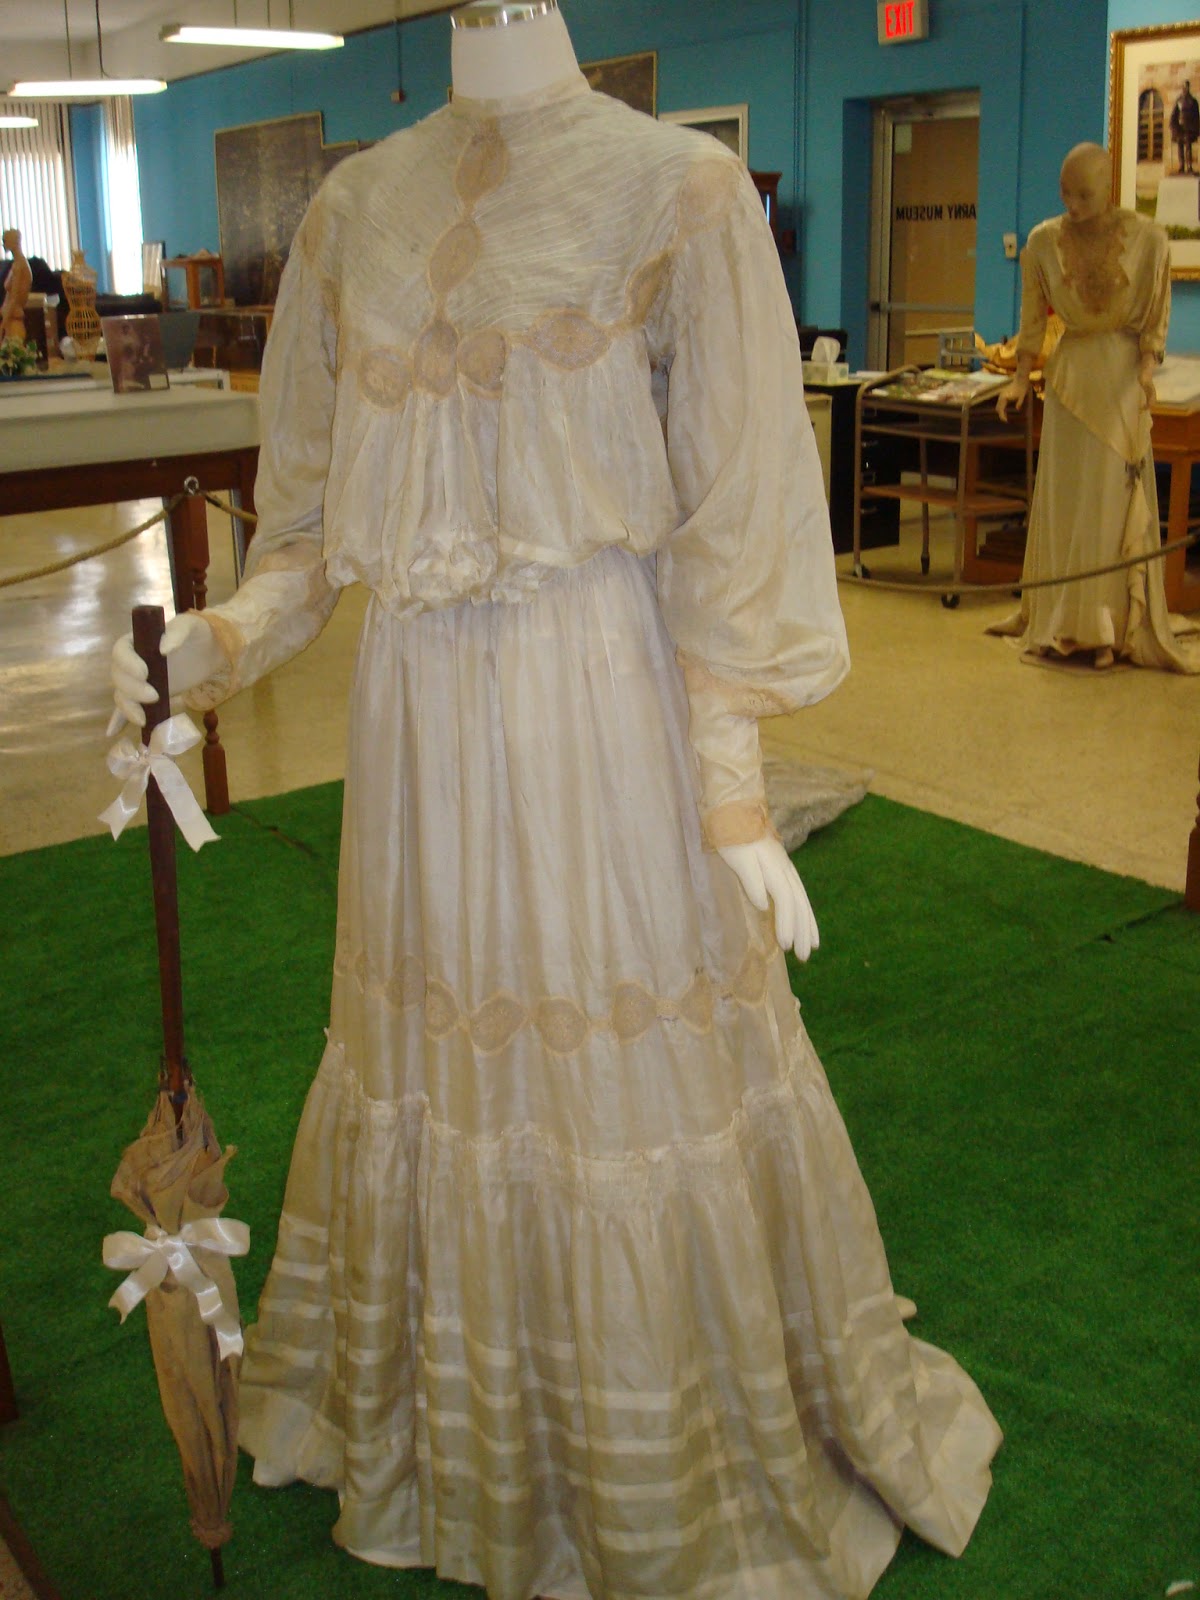
Wednesday, July 31, 2013

1907-09 Blue Wool Visiting Dress

"2-piece Hyacinth Blue Suit and Blouse. Worn in Kearny by Florence Parisen Kennealy who was a milliner and made the blue plume hat. Circa 1900. Gifts of the Autenrieth Family."


This once hyacinth-blue wool visiting gown has since faded to rather pleasant purple. I believe it was one of the earliest donated to the museum, as there is mention of it in the commemorative pamphlet of the museum's 10th anniversary, in 1987. The dress is dated c. 1900, but since 1900-1905 the pigeon breast look was in full swing, I think this ensemble is a bit later, from 1907-09.
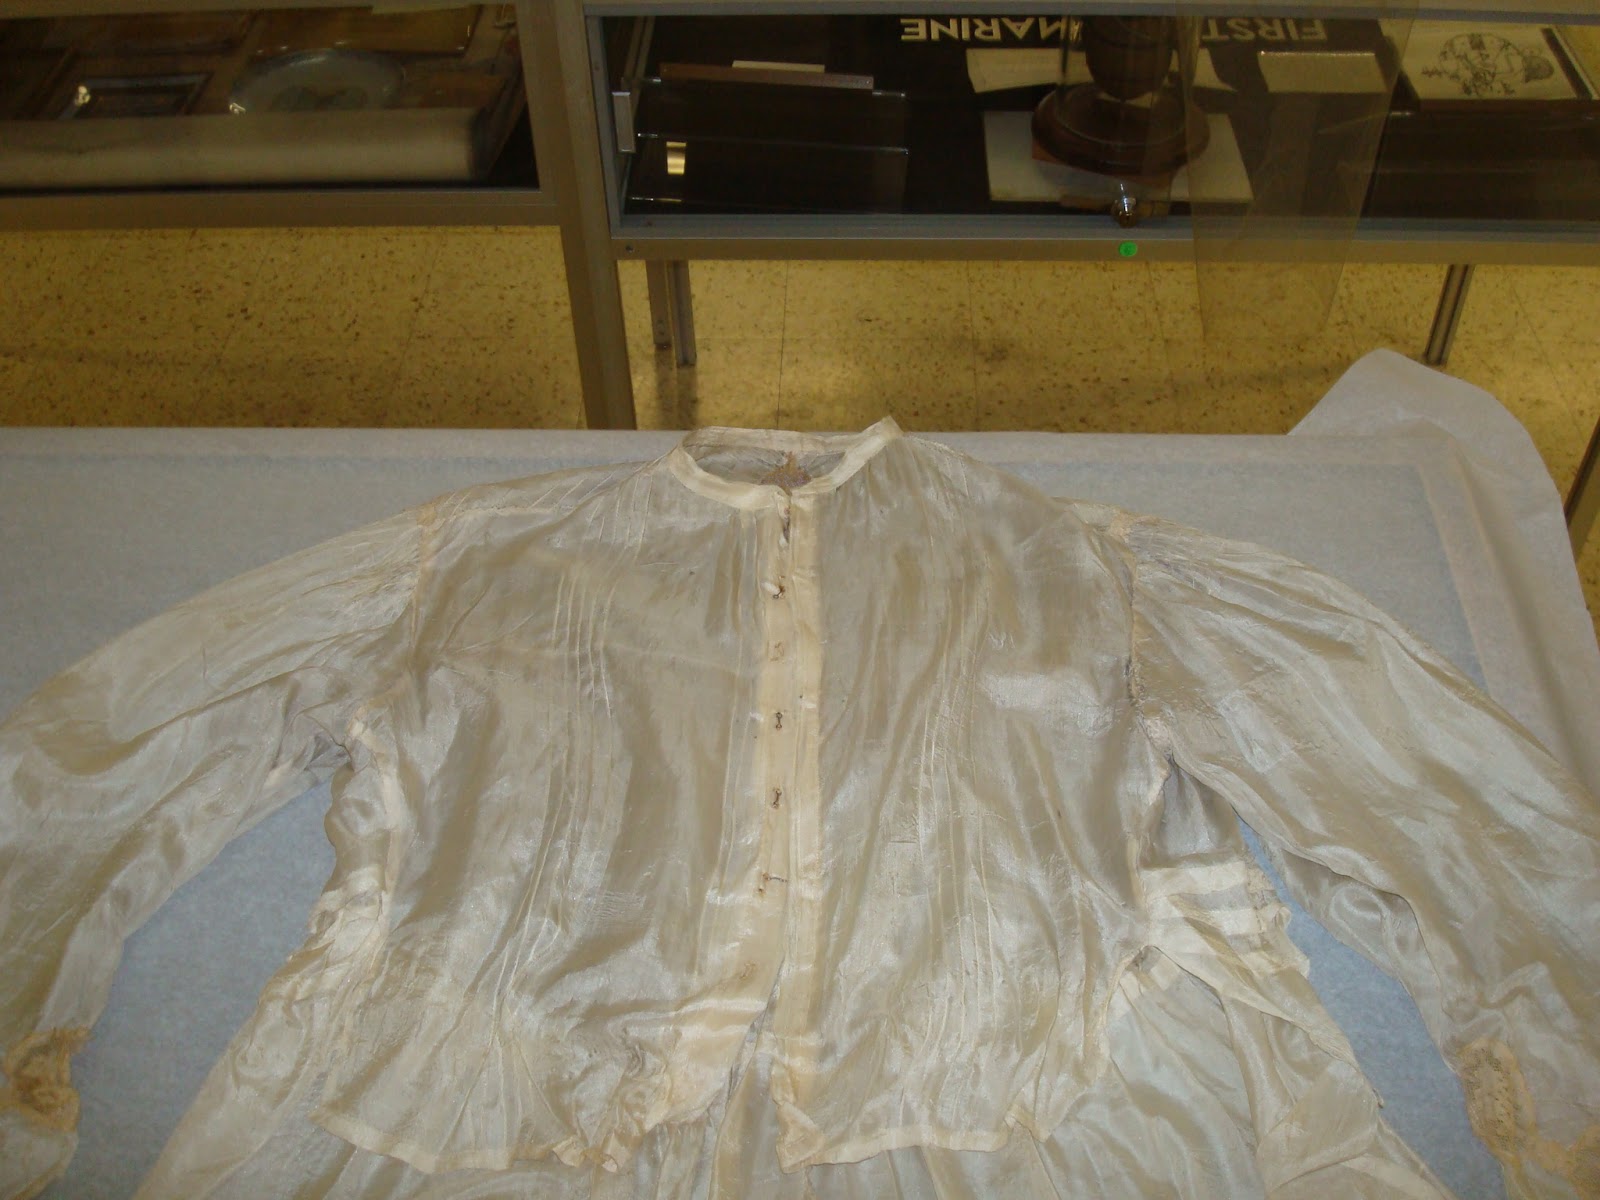
The visiting gown consists of a bolero, velvet cummerbund, shirtwaist, and skirt. The shirtwaist is made of silk and decorated all over with small pintucks. The sleeves gather into wide cuffs that each close with two eyes and thread hooks. There is gathering on the front and back of the shirtwaist, anchored onto a piece of bias tape. The back of the shirtwaist fastens with hooks and eyes. The high collar is missing the hook and eye closure.

"Shirtwaist" was a generic term in the Edwardian period for garments of this nature.

Center back closure.
Interior of the front gathering. Rust stains from pins on the bias tape. A small stain on the lower right hand side that is residue from masking tape that was on the mannequin.
Evidence that the bias tape was once part of a waist stay (a length of bias tape fastened around the waist to prevent the garment from shifting out of place).
This garment is actually rare in that it is a "plus sized" garment--the waist measurement of the skirt is 38", which would be the waist measurement when corseted. Often, people think that women of the past were all petite and small waisted, but that is not always the case. This skirt would fit a size 10-12 woman by today's standards. The mannequin was obviously too small for the skirt, so whoever had displayed it had folded the excess fabric inwards and pinned it down--thus reducing the creative effect of the decorative pleats along the hem. The 9-gored skirt is made of the small wool as the bodice. It features an interesting pleat and button detail around the hem, and has a small godet in the back which provides a bit of flare. The waist is simply bound in coordinating twill tape, folded over and stitched down. The center back placket fastens with hooks and eyes. All of the interior seams are bound with bias tape. Curiously, some tears in the skirt had been covered from the inside with a sort of wide blue adhesive tape. This appears to be original, as in one place it was attached beneath the twill tape waistband.

Visible fading within the pleats of the skirt.
The excess material of the skirt that was folded under and pinned.
One of the blue adhesive tape "mends."
The rich blue velvet cummerbund remarkably seems to have very little to no shaping; it is cut straight as a rectangle. The underside is lined in ivory silk. The cummerbund fastens with four large, sturdy hooks and eyes.


The bolero is the most decorated piece of the ensemble. The sleeves are wide and curved, and end in large cuffs that imitate the decoration on the bodice. The sleeve caps are gathered, and the seam is hidden beneath the shoulder portion of the bodice.  The front of the bolero is decorated with a faded blue velvet inset featuring machine-made embroidery and more of the velvet-covered buttons that are featured throughout this ensemble. The velvet decoration goes all the way around the neck, too. Between the velvet and wool is decorative trimming made of pleated silk. It closes with numerous small hooks and eyes along the front.


From here, you can see how wonky the folded up skirt looks.
The embroidered decoration and the pleated trim is all in pretty bad shape; every time I touched the velvet, I was greeted with a shower of blue dust.
On the left, you can see where a piece of the pleated silk trim has broken.
The interior of the bolero is lined in the same ivory silk as the cummerbund.
At the neck, the silk has been reduced to fibers. Might this be because of exposure to sunlight? The blue threads holding down the embroidery are all that is keeping these silk threads in place.
A random tape attached to one of the armscythes.

The bolero was stuffed with crumpled up yellow paper towels.
I wanted to display the dress how it should be displayed, showing the full-figured shape of the wearer. To achieve this, I used a method I discussed here and I padded up the mannequin with almost all of the cotton batting I had on hand. I had to clean the mannequin first, but I didn't realize how dirty it was when I sprayed some Windex on it and a few moments later had a foamy brown sludge all over the mannequin. Naturally, weird methods were originally employed in displaying this ensemble: the bolero was stuffed with yellow paper towels and the skirt was stuffed with the newspaper from the 80s (the pages devoted to weddings and related advertisements, actually). The padding on the mannequin eliminated the need for paper towels, and to help fashionable fluff out the skirt I used large rolled up wads of archival tissue paper.

D :
I also added "shoulders" out of the batting to keep in with the proportions of the figure.

  Finally, what you've all been waiting for, the spruced up version!

Complemented with a mink fur muff (lined in brown cotton) and an 1890's silk and tulle parasol with a curved bamboo handle, silk tassel, and ivory tip.
Quite a buxom madame!

Sunday, July 28, 2013

A Few Blog Updates and a Smoking Chair of Exceptional Provenance!

I'm not aware if you noticed, but I recently updated some of the features on the Kearny History Museum Blog.

I added several easy-to-access pages under the title: Home, About the Museum, and About the Author. I felt that this would help keep the blog organized and would facilitate the experience of new visitors to the blog. I also wanted to provide some information about myself, to make the blog seem more personable.

Due to the great influx of pageviews on museum-related posts, I decided to try to make my blog more accessible to new readers by installing a "Follow By Email" button. Now any new visitors can stay connected with the latest happenings! To further facilitate the experience of visitors to the blog, I added some basic information on the Museum's hours and location to the right-hand side of the blog.

And now, a special treat: a tufted velvet smoking chair given to General Kearny by Napoleon III! General Kearny spent a portion of his life in France.

General Kearny's Smoking Chair
"Napoleon III of France presented General Kearny with the pictured smoking chair. The picture shows the chair with its original blue velvet upholstery and silk fringe, with a delicately carved back with a cigar motif. Its hinged cigar box on the chair’s back is upholstered in blue velvet as an armrest. It is the only chair of its type in this country, a similar one being in a Paris museum. It was used by the general in his home at “Belle Grove”, which was more commonly called Kearny Castle. Virginia Livingston Hunt, who was Kearny’s granddaughter and Agnes Maxwell Kearny, who was his second wife, donated the chair. Hunt’s regard for the late Harold Latham and his interest in her grandfather motivated her to have the general’s favorite smoking chair returned to the town carrying his name. It had been part of the Traphagen Museum Collection until she arranged for its homecoming to Kearny in 1968."

Saturday, July 27, 2013

c. 1906 Flounced Petticoat

Trying my best to look like Evelyn Nesbit, the Edwardian chorus girl and model.
Just like the 1910s Graduation Dress, the 1906 Wedding Gown looked woefully abandoned without the proper shapewear underneath. This petticoat will help achieve the fashionable shape of the era, will help protect the skirt from the floor, and will also help highlight the delicate lace and gathering details of the skirt.

I constructed this petticoat in the same way I made the 1910s petticoat. The only difference was that this petticoat had to be fluffier to hold out the shape of the fuller skirt. Therefore, I only constructed the top half in the same manner as the 1910s petticoat--the bottom half  were two machine-gathered flounces in incrementally larger widths. Since the flounces were rectangles, I sewed up the hem by machine since there was no fiddly curved material to contend with. The waistband was constructed in the same way. I moved the pleats to the back to direct the fullness there.


Hem turned once and pinked.
Making use of the selvedge edge as a placket.
On the dress form.
The 1906 Wedding Gown with its custom made petticoat.

Friday, July 26, 2013

Manipulating Dress Forms and Mannequins to Display Antique Clothing

Some dresses, especially antique ones, require custom mounts to accommodate the measurements, proportions, and shapes achieved by the corsets in fashion.

When placed on modern mannequins, historical garments not only have a very slight chance of fitting well, they also "just look wrong;" this is because our 21st century shape is vastly different from the shape achieved by wearing structural undergarments such as corsets, petticoats, and panniers.

To remedy this issue, either in the museum or archival setting or for the home display, is not a task of Herculean proportions.

Try to find dress forms that are made of foam: this will make them easy to carve and manipulate. Before I get to carving my dress forms, I remove the arms and the arm brackets. I remove the stitches from the crotch seam so that I can pull up the jersey cover, and to keep the cover out of the way, I usually knot it a few times so that it is compact and the outside of the cover won't come into contact with the stryofoam dust.


I carve with the small fruit knife pictured (for fine carving) and a large bread knife (for quickly hacking off large chunks). To smooth down the cuts, I sand with a dry pot scrubber or a piece of sandpaper.

Sometimes, padding up is also necessary. I do this after I have carved down my dress form, as the unbleached natural cotton batting I use will be secured to the jersey cover. I try to cut oval-shaped pieces to layer up to achieve the desired "fluffy" affect. I sew the layers of the cotton batting using a long embroidery needle and thread, and I whipstitch around the edges.

Just as with the carving, you have to be patient with this process. It's a lot of trial and error; there's no cheating here.
With the jersey cover on. This big bum is for the 1906 Wedding Gown.
With that said, mannequins aren't totally useless. They can't be made smaller, but can be made larger with padding. However, the batting needs something to anchor itself to. In this case, remove all the limbs from your mannequin, clean it up, and use some old or cheap pantyhose! Cut off each pantyhose leg at the crotch and toe, and then cut a slit lengthwise down the pantyhose. Sew both legs together for a tube that is double the width of a single pantyhose leg. Roll this over your mannequin, and you can start sewing on batting!


A sloppy but sturdy hand-sewn seam.

NEVER change the garments to accomodate the mount. There were a pair of beaded cotton gloves in the Kearny History Museum that had slits up to the palms so that the gloves could fit on the mannequin's hand. Remember that that is PERMANTENTLY DEFACING antique and often RARE garments and should not be done! When in doubt, talk to a museum or textile specialist for ideas, or leave the item in safe storage. Not everything is meant to be nor is appropriate for display.

Do not under any circumstances permanently damage an antique and often rare piece by altering it to fit a display, such as these cotton beaded gloves that were slashed open to fit the mannequin's hand, and then taped shut.

Thursday, July 25, 2013

1906 Wedding Gown

"1906 Wedding Gown of Rose Gregorio when married to Enrico Varlese. Both were residents of Kearny, lived on Maple Street and there raised their family, Mary Varlese Macfie and Catherine Varlese Crane.
Gown gift of Catherine Hickenthier of Toms River, N.J., Rose's granddaughter."

This garment is actually one of those that has the most information about its provenance. This wedding gown even comes with a photo of the bride and groom and a marriage certificate!

Sorry for the obscuring flash, Mr. Varlese!

But that is just about where the good things on this particular display stop. Disappointingly, the gown has been displayed on a wicker dress form. Over time, the sharp wicker has worn away at the thin, fragile silk of the gown. The dress was also displayed in a way that neglected the fashionable "S-bend" corseted silhouette of the time, and was dismally accessorized.

Damage from the wicker dress form between those itty bitty pintucks, and you can see how thin the silk is.
...What?!?
....A bread bag tie. For the veil. Made of stiff grey net. This is a big, lazy, design "no."
There aren't any arms on this wicker dress form, so the lovely sleeves have been pinned onto the skirt. Inside the sleeves were plastic sandwich bread bags. I can't even make this up if I tried. This is so disappointing.
The plastic sandwich bread bags that were holding up the sleeves. NEVER  allow plastics near antique textiles, as they will let off harmful chemicals, especially under intense heat (like right under a huge skylight...)
The paper-clipped parasol from this post.
This wedding ensemble consists of a bodice and skirt. Both pieces are decorated with tucks (super small tucks on the bodice, and much larger tucks on the skirt), gathering, and delicate lace insertion. The bodice is of the pigeon-breasted style popular in the early Edwardian era of excessive froth and frou-frou, but it was impossible to notice this interesting period detail the way the dress was displayed. The sleeves are long and full, with rows of machine-made gathering at the sleeve cap; they taper down to fitted cuffs decorated with matching lace. The bodice and skirt close with hooks and eyes along the back.


Tearing around the armscythe, on the back of the bodice.
Excessive shattering in the fragile silk, probably from the skirt being pinned onto the bodice for the display.
Along the side seam, there was a huge tear, where it appeared that a triangular chunk of material had been removed.
Armholes bound in bias tape, yellowed with age and stains.
A cotton slip underneath the gown. However, it didn't stop the bodice from being worn out by the wicker.
This wedding gown will now be displayed on a dress form, which I carved down to achieve the right shape and measurements. I made a flounced petticoat to both protect the skirt and help hold it out into the right shape. However, even after all this, the dress form still didn't have enough "oomph" in the derriere, so it was time for me to break out the all-natural unbleached cotton batting and pad up the dress form.


What an improvement!
S-bend shape with pigeon-breasted front, and the slight train of the skirt filled out by the flounced petticoat.

With the newly be-ribboned parasol.
Most of the hooks and eyes were either missing or damaged, so I had to get creative with how to keep the dress safely on the dress form...I decided to use flat-headed T-pins to hold the fabric down without piercing the delicate silk.

In the upper left-hand corner, you can see some mending on the waistband. I'm not sure if it's original, or if it was added later. Also visible is all the shattering and holes in the silk, probably from the stress of the hook fastening.
Flat-headed T-pins holding down the collar. It's the back of the dress, and the gap definitely not noticeable enough that it will be distracting to the display.